![]()
Contents
The Spring framework
Spring is a free and open-source Java framework for building Java applications. It is mainly used for web-based apps. If you are not familiar with the concept of framework, it is important to define briefly what a framework is.
What is a framework
A framework, like a library, is a bunch of code packed together. The main difference is that offers a runtime execution environment. The idea of frameworks is that a developer specifies some components, and under the hood, the framework drives the execution. This concept is called Inversion of Control (IoC): the execution is not managed directly by developers but by the framework itself.
Usually, a Java framework like Spring consists of a runtime environment plus a library.
Do you remember JUnit? Well. Junit is a framework: you specify test methods, but not how to run them. You don’t have to define a main function that calls the test methods. It is the framework’s responsibility to manage how to run it (IoC). Let’s recall the simple test that we wrote in one of the previous lessons:
import org.example.Main;
import org.junit.jupiter.api.Test;

@Test
public void testAdd() {
    if (Main.add(12, 34) != 46) {
        throw new ArithmeticException("Wrong!");
    }
}
The JUnit framework understands that the testAdd method is a test because of the annotation @Test. Annotations are one of the ways that permit an interaction with a framework.
Spring dependencies
For our examples, we use the following Spring dependencies:
- Spring boot: enhance the Spring framework simplifying the creation of applications. Spring Boot manages a server and deploys our application on it in an automatic way.
- Spring web: this dependency adds Model-View-Controller (MVC) capabilities to Spring, easing the creation of web.
Initialize a Gradle Spring project
Let’s see now how to initialize a Java Spring Application. There are different ways to do that.
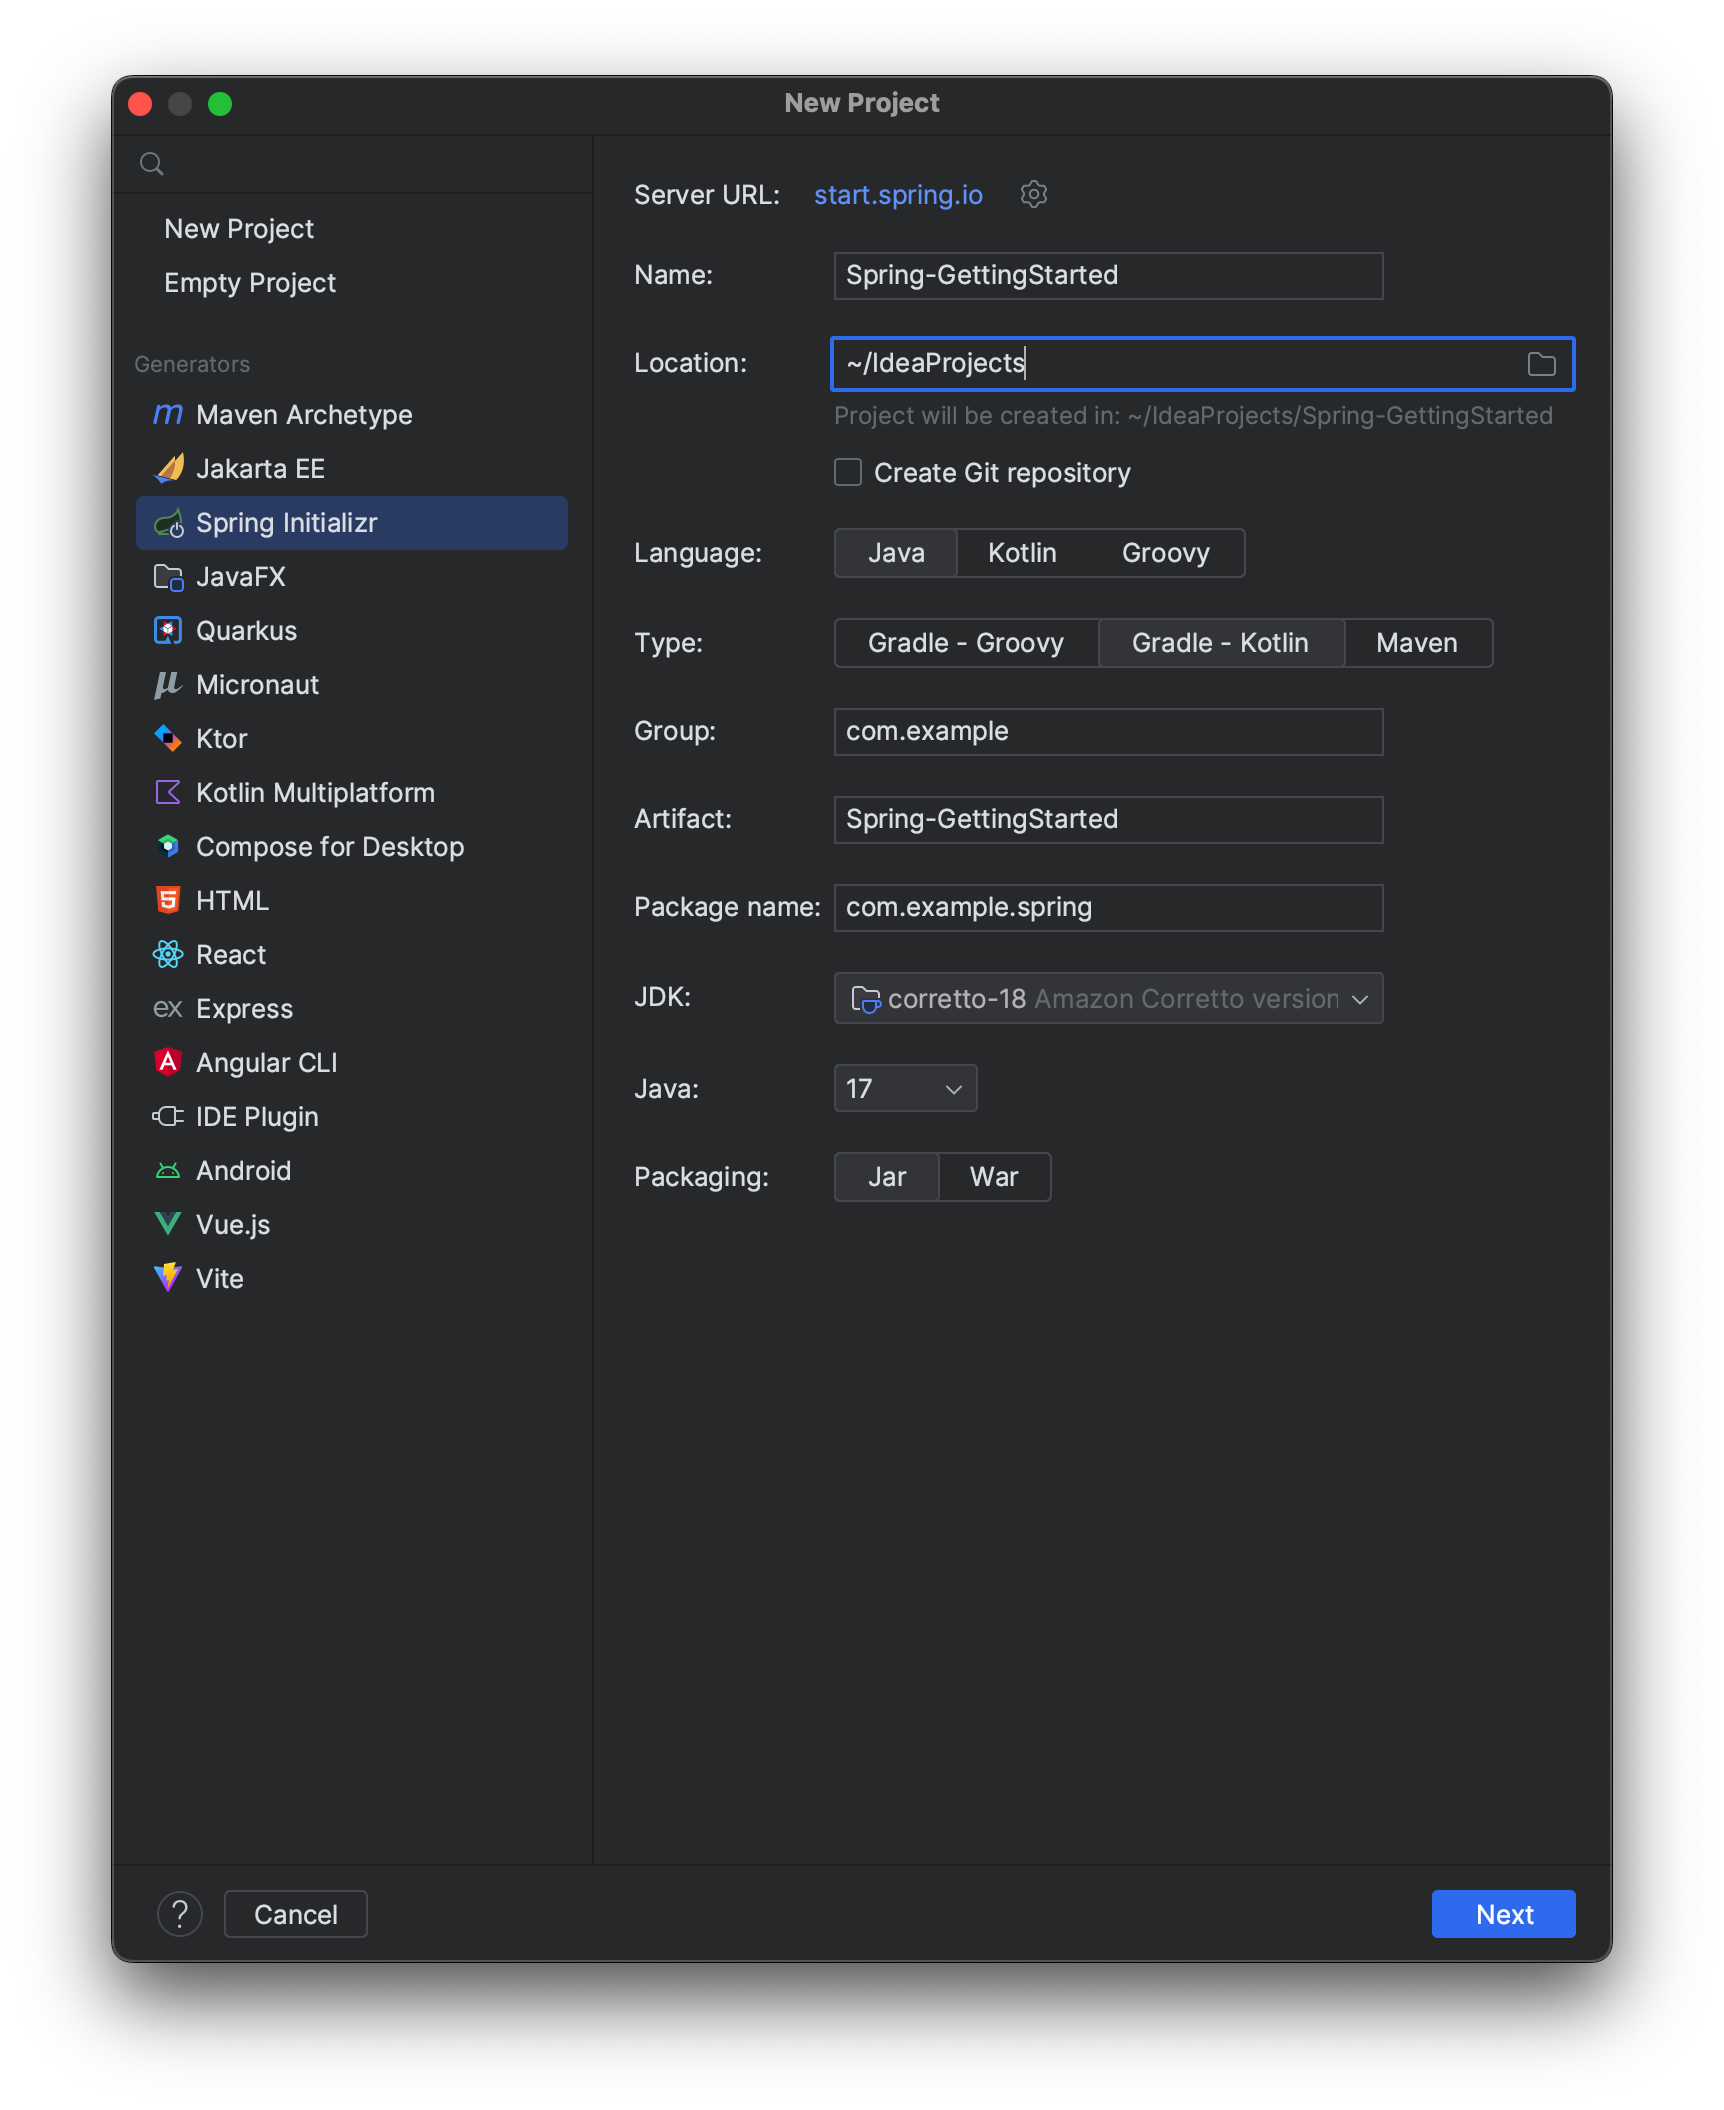
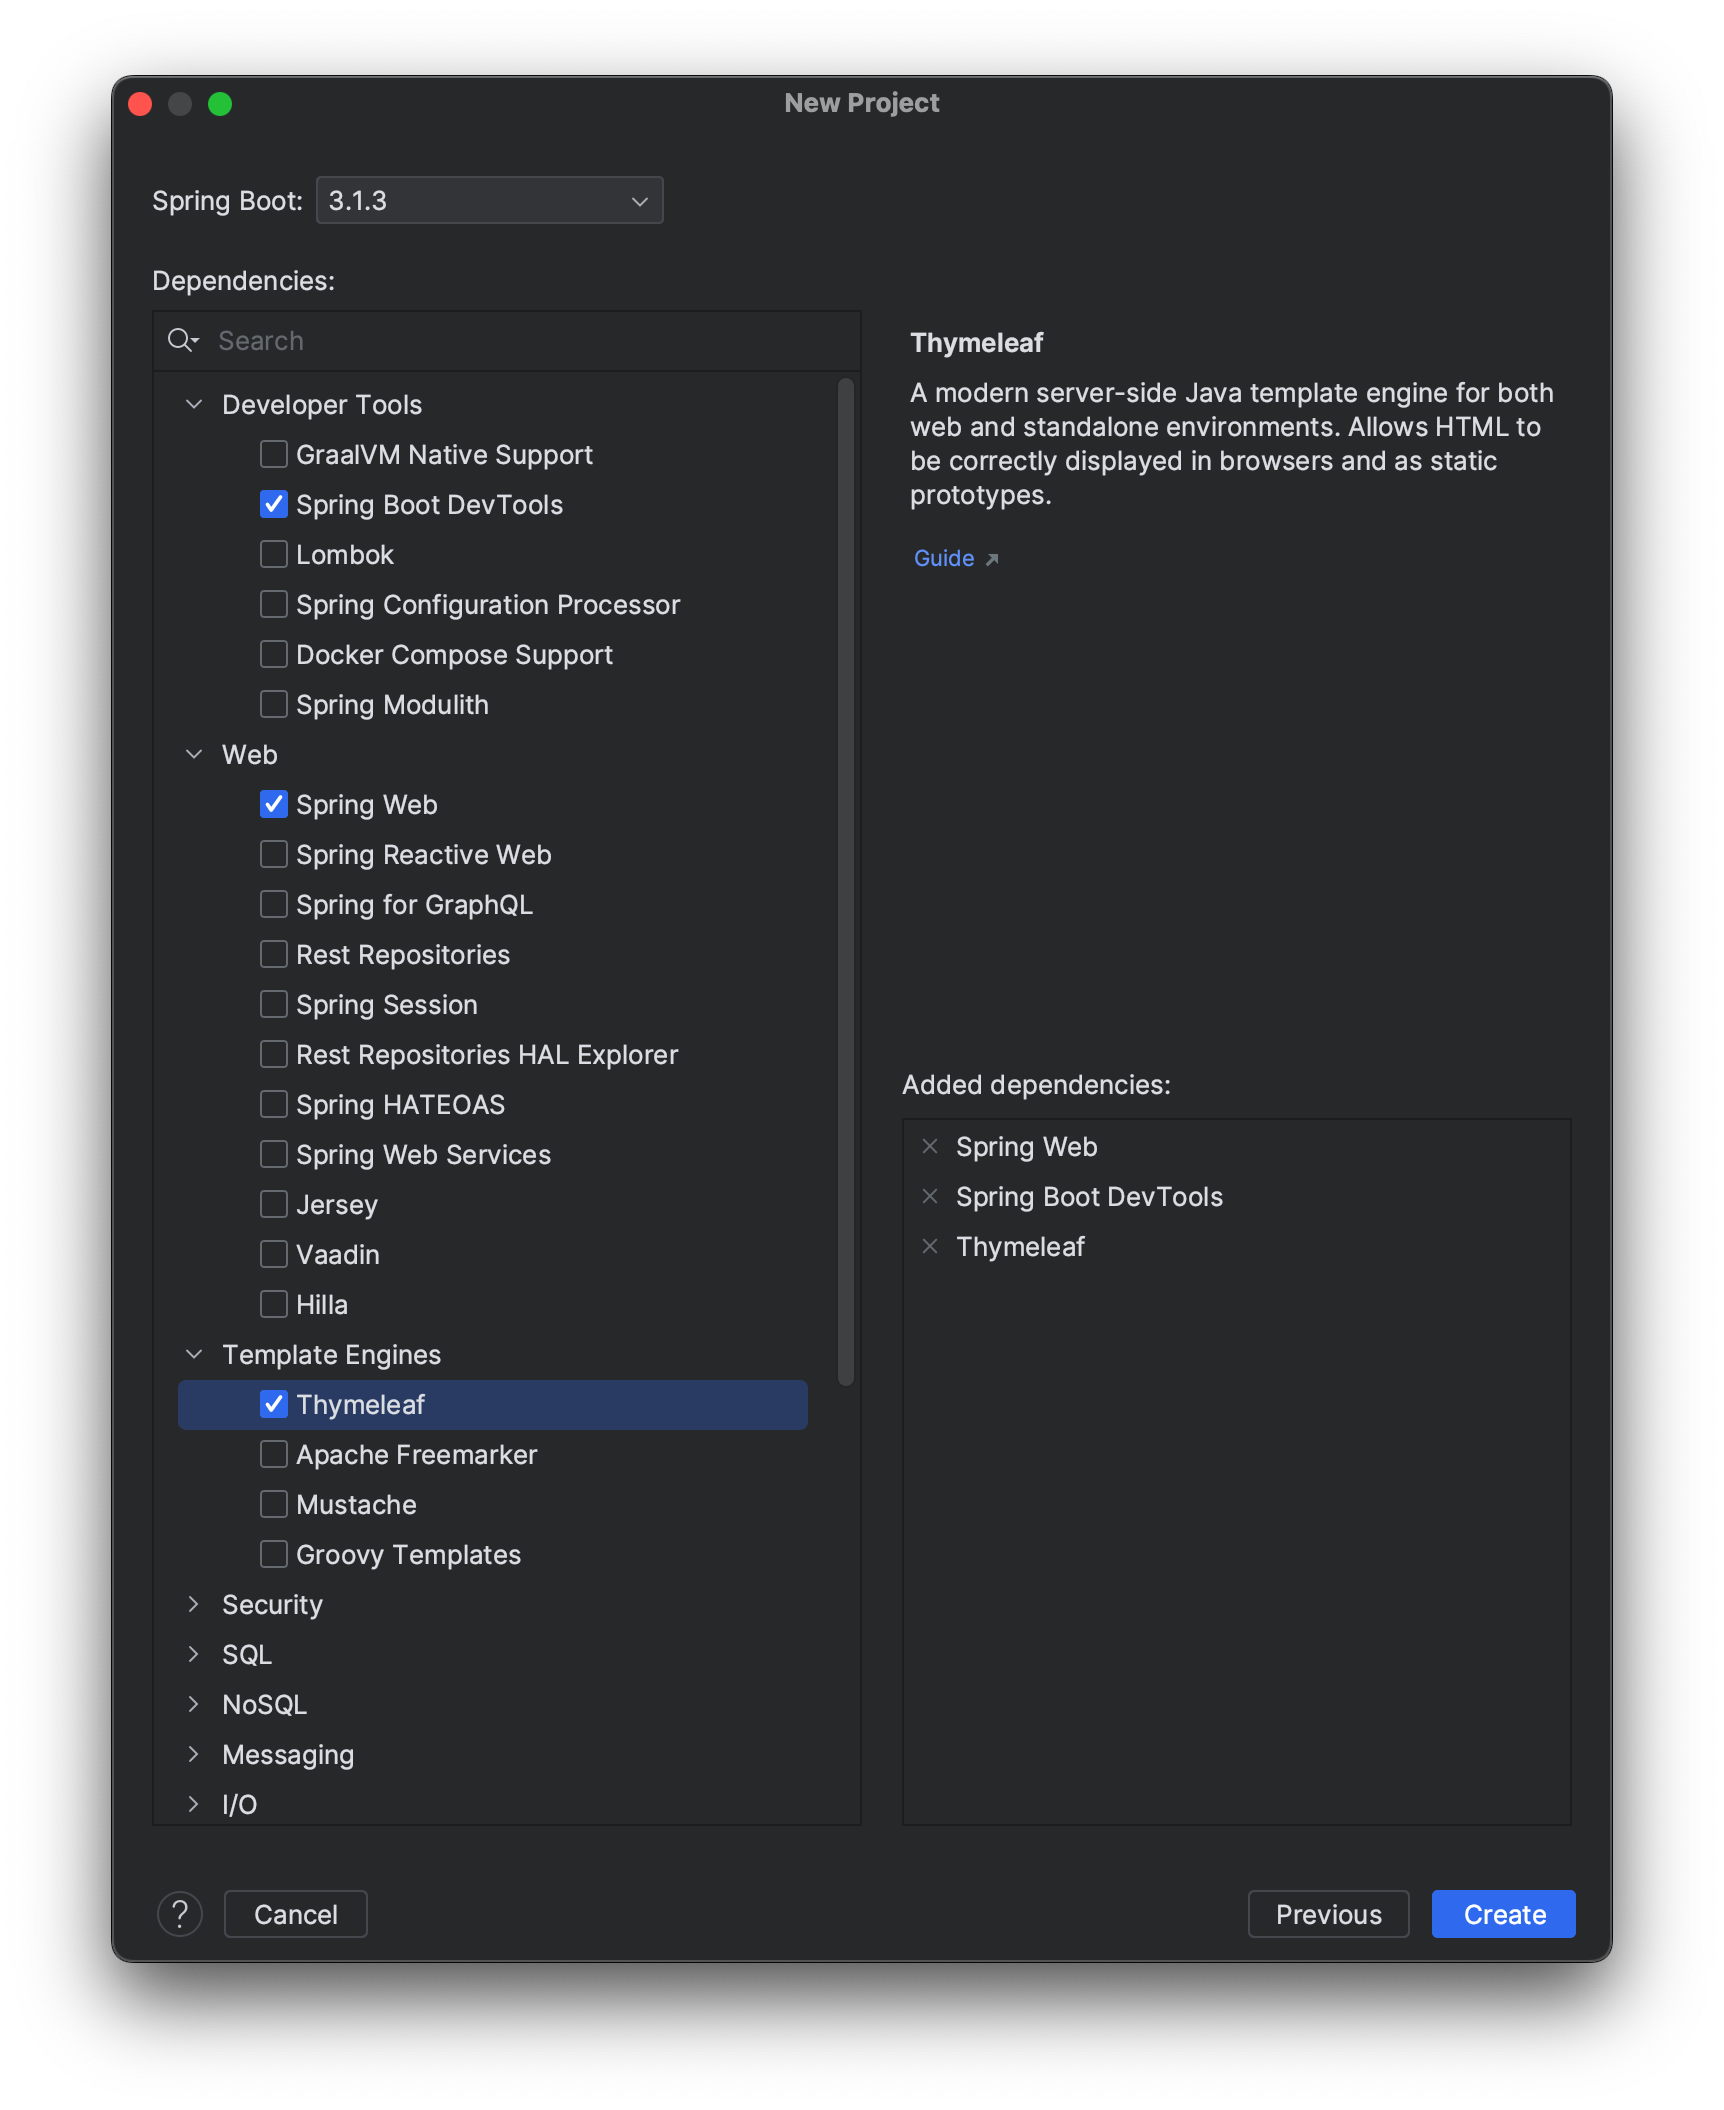
Using IntelliJ (Ultimate)
If you have installed the Ultimate version of IntelliJ IDEA, in the “New Project” view should appear an option named “Spring Initializr”: select this, fill out the form, and click “Next”. Select the dependencies that you want to install (Spring Boot, Spring Web), then click “Create”.
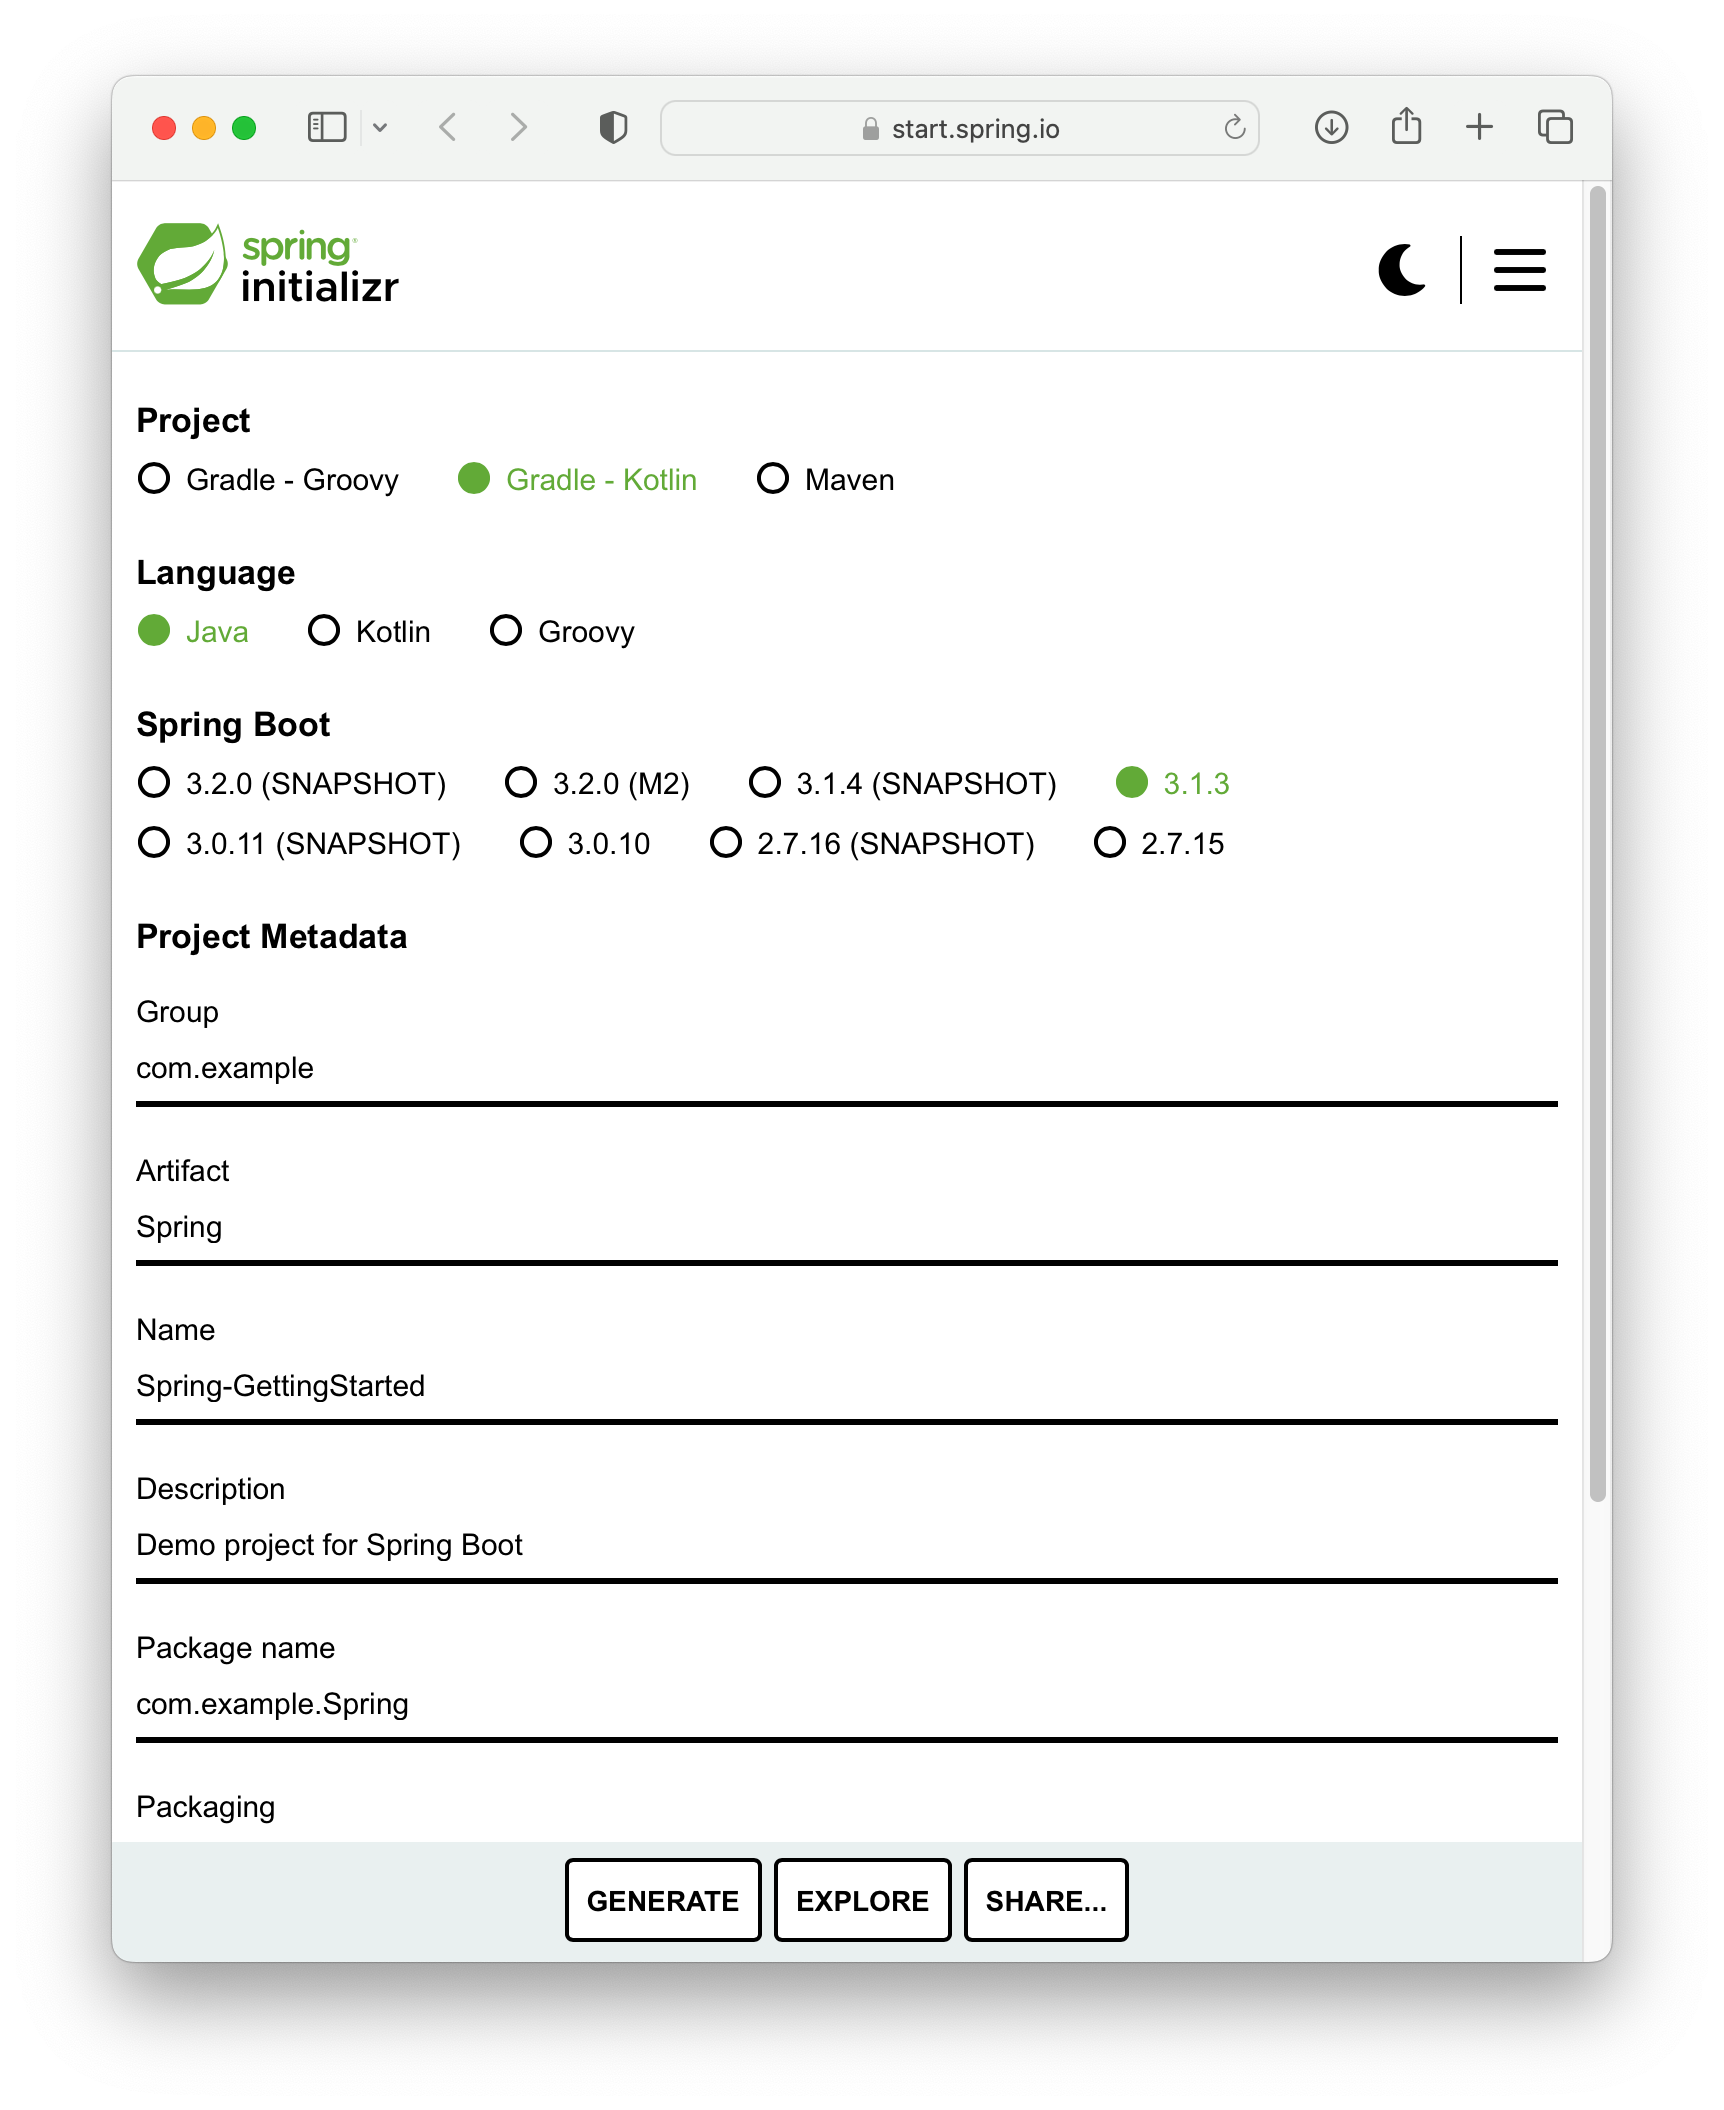
Using Spring initializr
Here, you can find a nice online tool that helps you create a Spring Project. You just need to fill the form with all the appropriate information, add the dependencies previously mentioned (Spring Boot, Spring Web), and click the “Generate” button. This action will download a .zip file containing your empty Gradle project with Spring dependencies. You can then, after unzipping the .zip, open the project with your desired IDE and start working on it.
By Hand
You can also initialize a Spring Web application by configuring plugins and dependencies in your build.gradle:
plugins {
    java
    id("org.springframework.boot") version "3.1.3"
    id("io.spring.dependency-management") version "1.1.3"
}

group = "com.example"
version = "0.0.1-SNAPSHOT"

java {
    sourceCompatibility = JavaVersion.VERSION_17
}

repositories {
    mavenCentral()
}

dependencies {
    implementation("org.springframework.boot:spring-boot-starter-web")
    developmentOnly("org.springframework.boot:spring-boot-devtools")
    testImplementation("org.springframework.boot:spring-boot-starter-test")
}

tasks.withType<Test> {
    useJUnitPlatform()
}
Getting Started
If you choose to initialize the project directly by editing the build.gradle file, you need to add this class in the file java/com/example/spring/SpringGettingStartedApplication (don’t worry, we will see later the meaning of this snippet of code):
package com.example.spring;

import org.springframework.boot.SpringApplication;
import org.springframework.boot.autoconfigure.SpringBootApplication;

@SpringBootApplication
public class SpringGettingStartedApplication {

    public static void main(String[] args) {
        SpringApplication.run(SpringGettingStartedApplication.class, args);
    }
}
Create also a class Hello.java in the file java/com/example/spring/controller/ and insert this content:
package com.example.spring.controller;

import org.springframework.web.bind.annotation.RequestMapping;
import org.springframework.web.bind.annotation.RestController;
@RestController
public class Hello {

    @RequestMapping("/")
    ßpublic String index() {
        return "Greetings from Spring Boot!";
    }
}
Now launch:
~/IdeaProjects/Spring-GettingStarted ./gradlew bootRun
> Task :bootRun
. ____ _ __ _ _
/\\ / ___'_ __ _ _(_)_ __ __ _ \ \ \ \
( ( )\___ | '_ | '_| | '_ \/ _` | \ \ \ \
\\/ ___)| |_)| | | | | || (_| | ) ) ) )
' |____| .__|_| |_|_| |_\__, | / / / /
=========|_|==============|___/=/_/_/_/
:: Spring Boot :: (v3.1.3)
2023-09-19T13:41:11.733+02:00 INFO 11933 --- [ restartedMain] c.e.s.SpringGettingStartedApplication : Starting SpringGettingStartedApplication using Java 17.0.8 with PID 11933 (/Users/giacomo/IdeaProjects/Spring-GettingStarted/build/classes/java/main started by giacomo in /Users/giacomo/IdeaProjects/Spring-GettingStarted)
2023-09-19T13:41:11.736+02:00 INFO 11933 --- [ restartedMain] c.e.s.SpringGettingStartedApplication : No active profile set, falling back to 1 default profile: "default"
2023-09-19T13:41:11.766+02:00 INFO 11933 --- [ restartedMain] .e.DevToolsPropertyDefaultsPostProcessor : Devtools property defaults active! Set 'spring.devtools.add-properties' to 'false' to disable
2023-09-19T13:41:11.766+02:00 INFO 11933 --- [ restartedMain] .e.DevToolsPropertyDefaultsPostProcessor : For additional web related logging consider setting the 'logging.level.web' property to 'DEBUG'
2023-09-19T13:41:12.293+02:00 INFO 11933 --- [ restartedMain] o.s.b.w.embedded.tomcat.TomcatWebServer : Tomcat initialized with port(s): 8080 (http)
2023-09-19T13:41:12.303+02:00 INFO 11933 --- [ restartedMain] o.apache.catalina.core.StandardService : Starting service [Tomcat]
2023-09-19T13:41:12.303+02:00 INFO 11933 --- [ restartedMain] o.apache.catalina.core.StandardEngine : Starting Servlet engine: [Apache Tomcat/10.1.12]
2023-09-19T13:41:12.344+02:00 INFO 11933 --- [ restartedMain] o.a.c.c.C.[Tomcat].[localhost].[/] : Initializing Spring embedded WebApplicationContext
2023-09-19T13:41:12.345+02:00 INFO 11933 --- [ restartedMain] w.s.c.ServletWebServerApplicationContext : Root WebApplicationContext: initialization completed in 578 ms
2023-09-19T13:41:12.578+02:00 INFO 11933 --- [ restartedMain] o.s.b.d.a.OptionalLiveReloadServer : LiveReload server is running on port 35729
2023-09-19T13:41:12.596+02:00 INFO 11933 --- [ restartedMain] o.s.b.w.embedded.tomcat.TomcatWebServer : Tomcat started on port(s): 8080 (http) with context path ''
2023-09-19T13:41:12.604+02:00 INFO 11933 --- [ restartedMain] c.e.s.SpringGettingStartedApplication : Started SpringGettingStartedApplication in 1.077 seconds (process running for 1.32)
<==========---> 80% EXECUTING [11s]
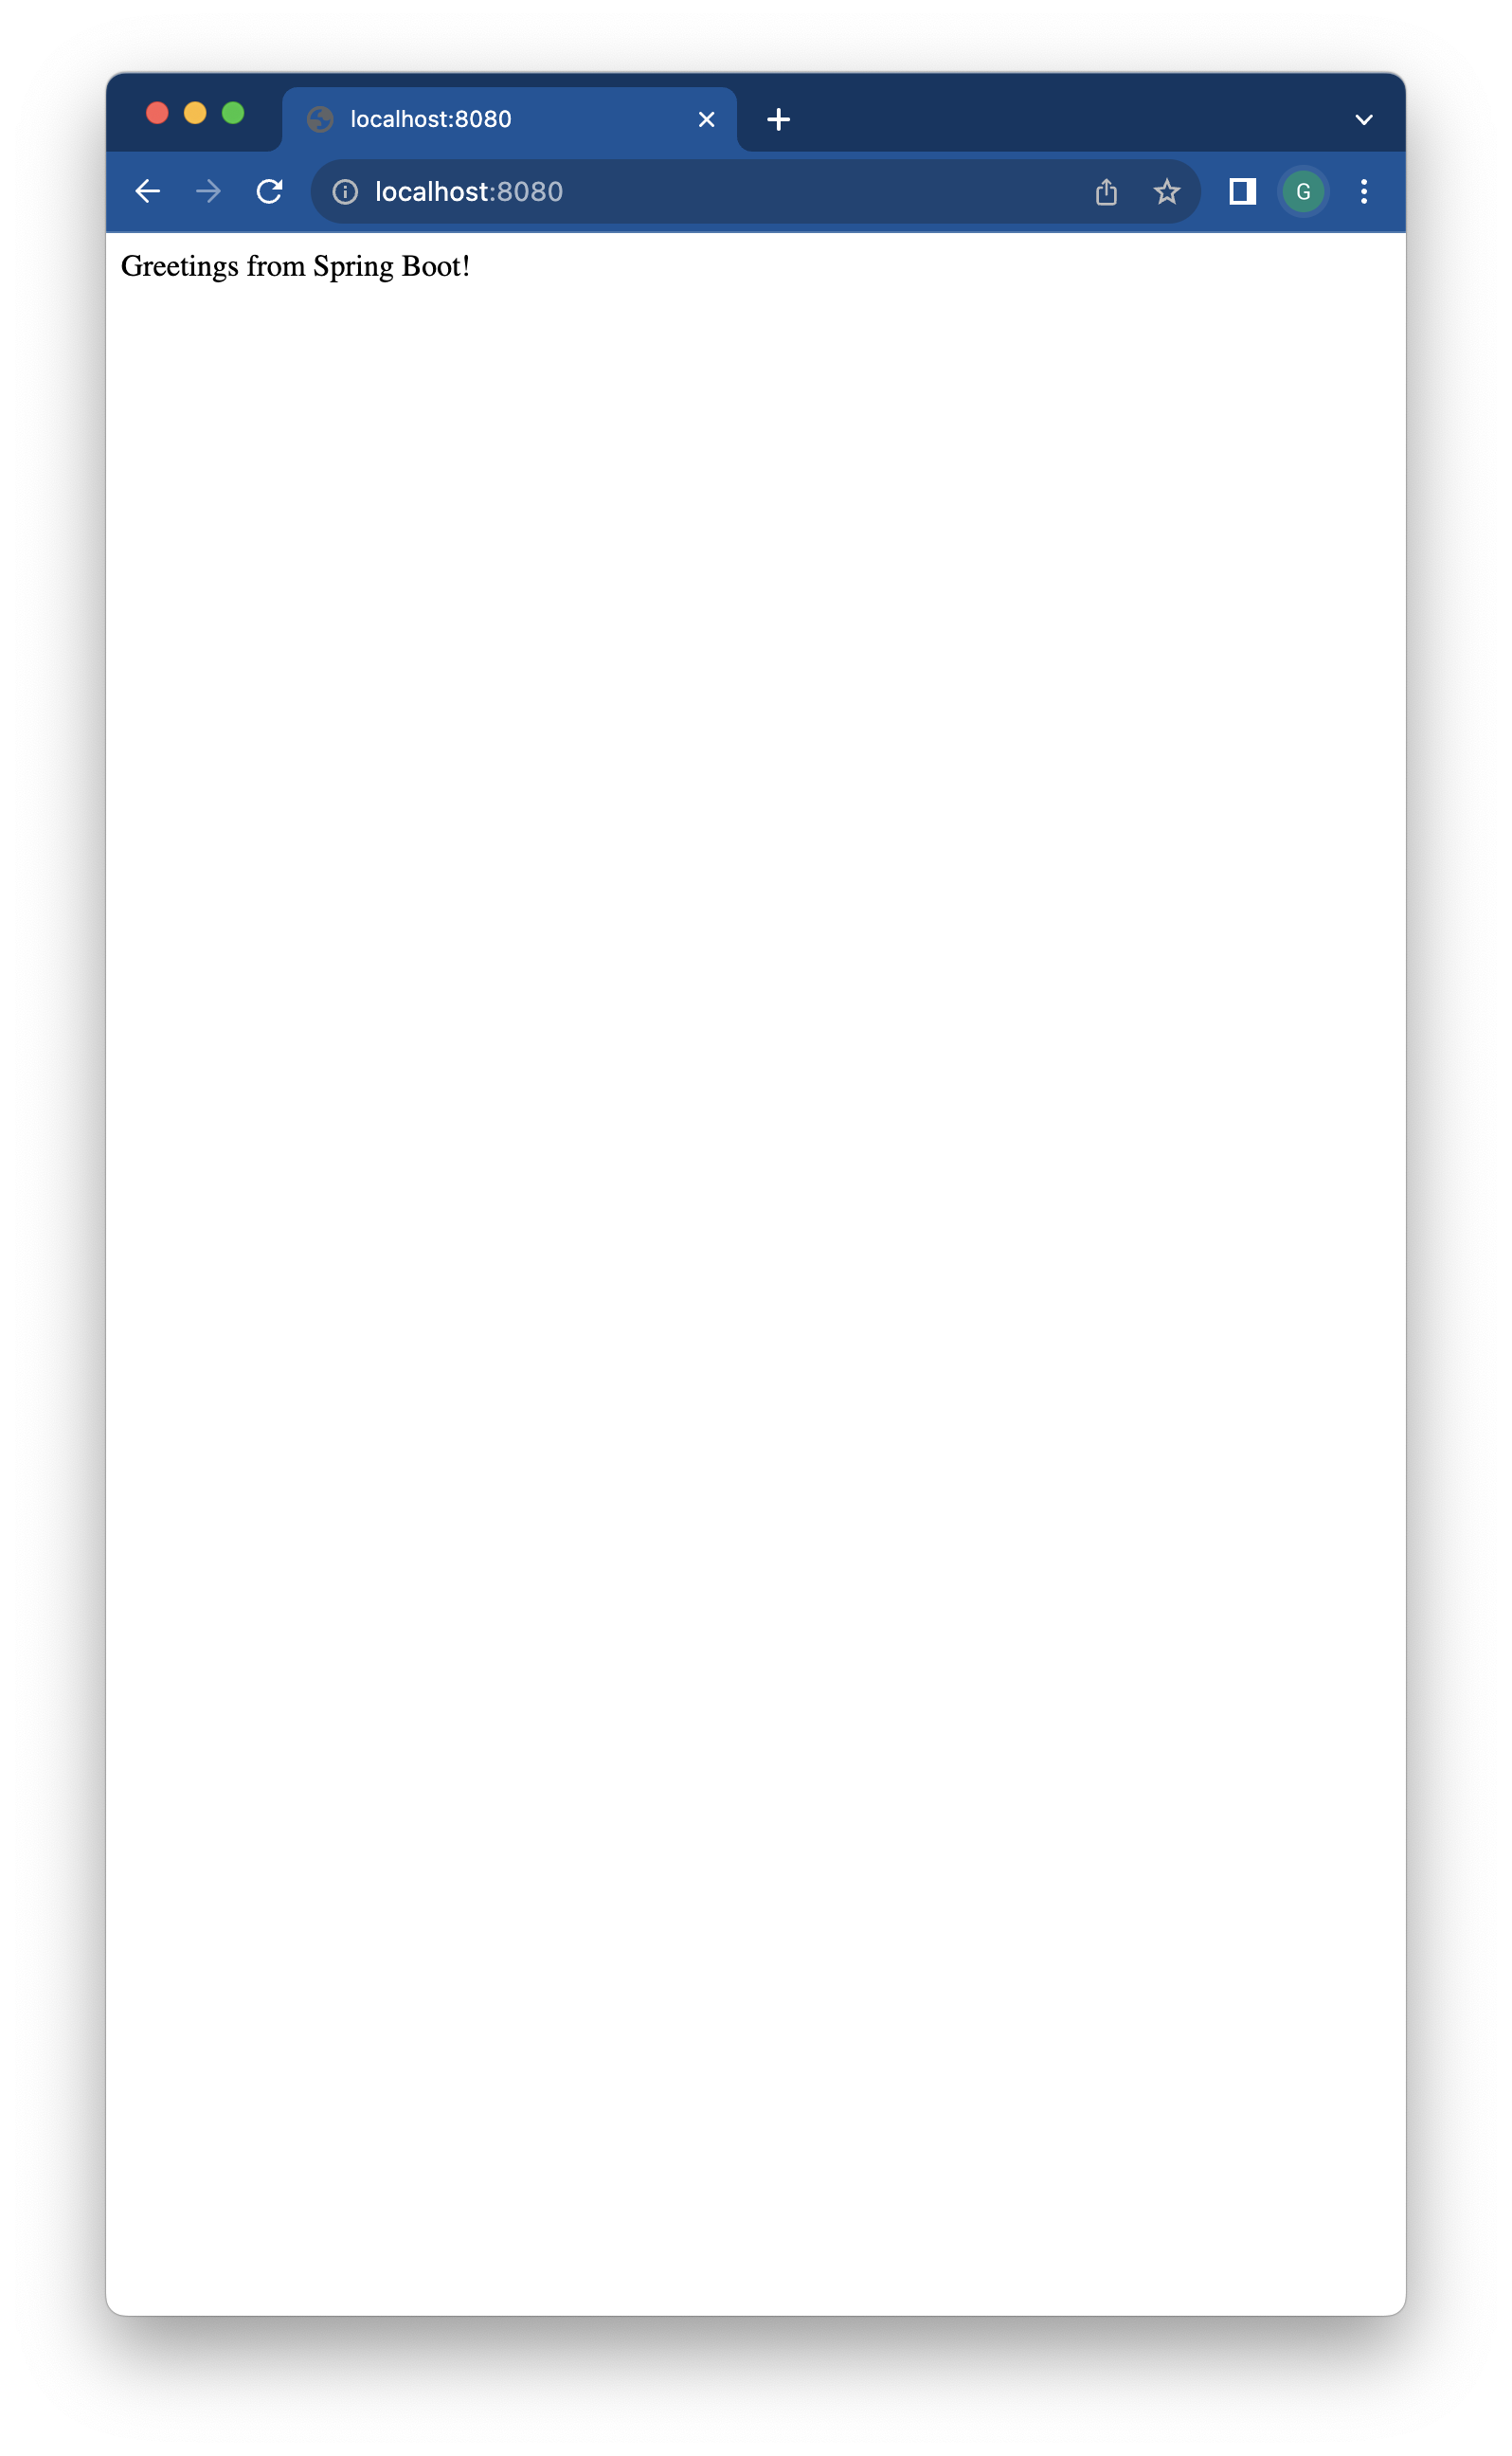
> :bootRunThis command calls the task bootRun, coming from the Spring Gradle plugin, that launches the Spring application. As you can see from the logs, a Tomcat server is initialized on port 8080. This is automatically done by the framework: it isn’t necessary to download and configure a Tomcat server! This is transparent from the developer’s perspective. If you go on localhost:8080, you can see the server in action:
 In the next lesson, we will see in detail what we have done so far.