![]()
Contents
What is Gradle
Gradle is an open-source build automation tool, that is, a tool that permits developers to automatize tasks like, for example, test execution, code compiling, deployment, and generation of documentation. It is the most popular build system for the Java Virtual Machine (JVM) and the default for Android. The peculiarity of Gradle is that it provides its own high-level and declarative build language that permits writing build logic with ease. In this course, we will focus only on the compilation part of Gradle for Java applications.
Installation
You can install gradle in many different ways:
- Installing IntelliJ IDEA: Gradle will be installed by default (Recommended).
- Installing the <a target=”_blank” rel=”noopener noreferrer” href=”https://code.visualstudio.com/docs/javJava Extension Pack for Visual Studio Code.
- Manual installation (just follow the documentation).
For this course, we will use Gradle with IntelliJ IDEA.
NOTE: Two versions of IntelliJ IDEA exist: Community Edition, which is free, and Ultimate, which is not. The Ultimate version has the support for Spring (that we will see in the next lessons). However, you can obtain a free Student License to use IntelliJ Ultimate (see here).
Gradle in Action
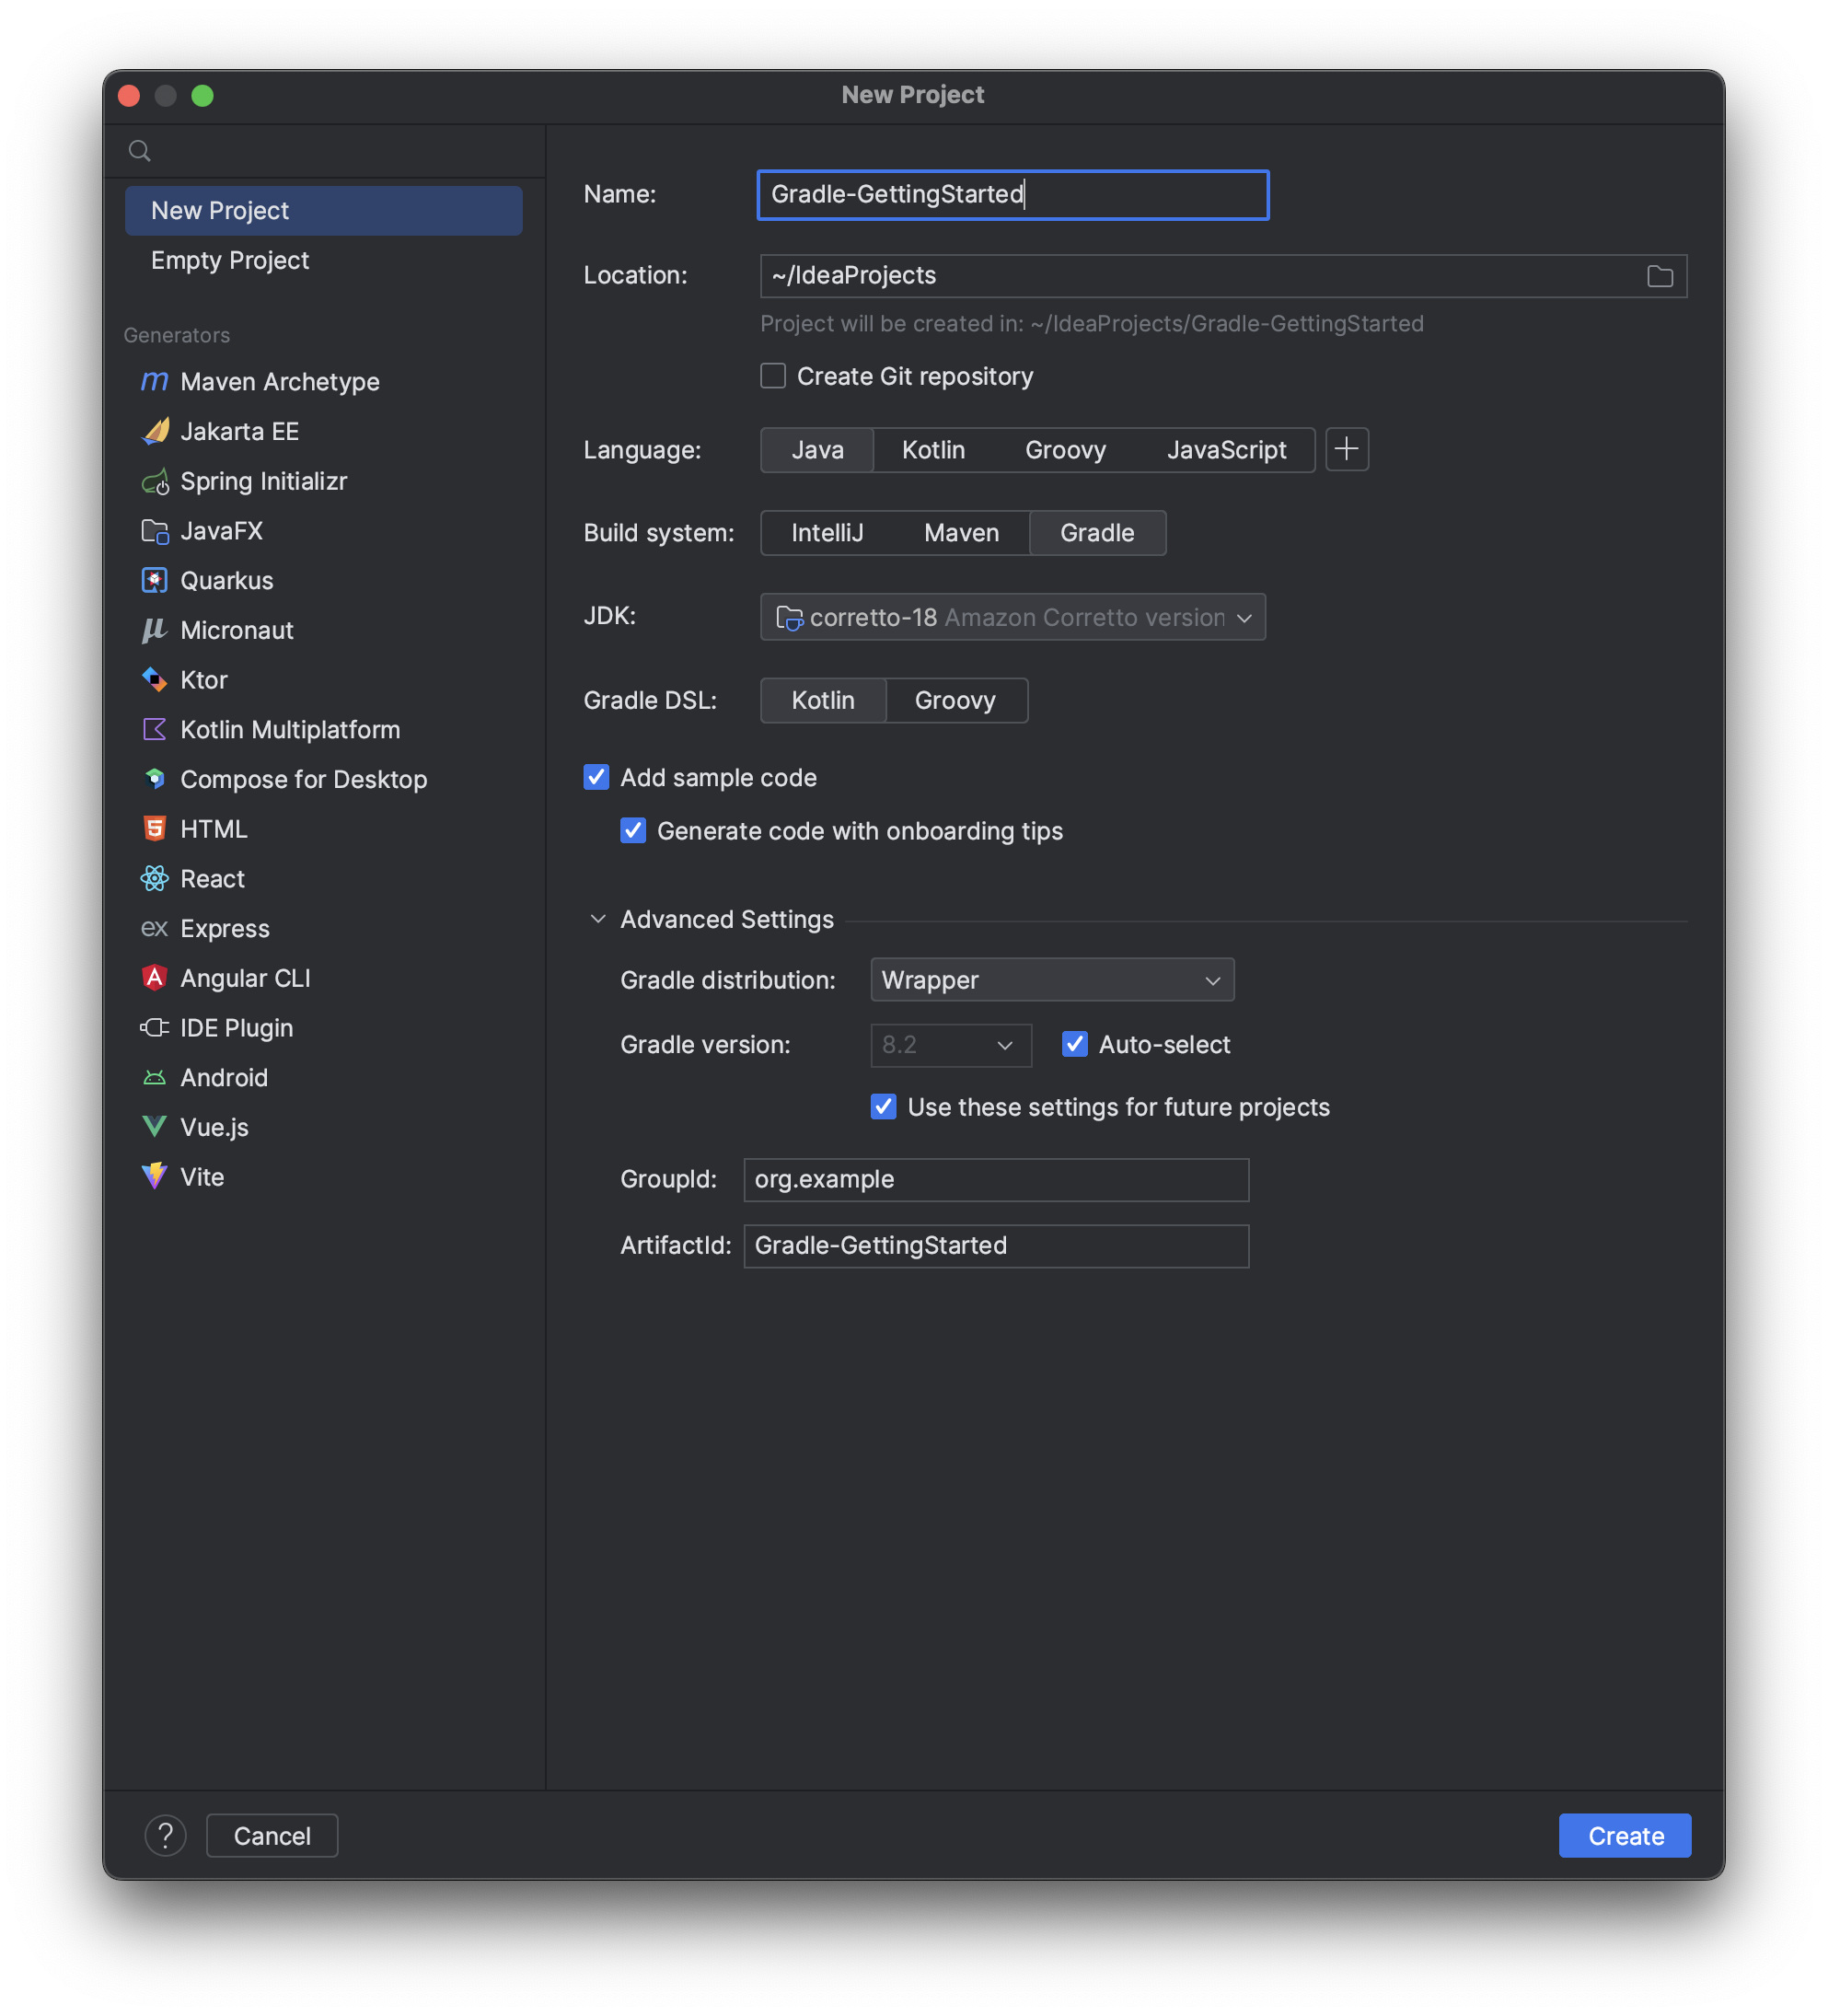
To see Gradle in action create a new Project with IntelliJ IDEA and choose Gradle as Build System. Set the other parameters as follows:
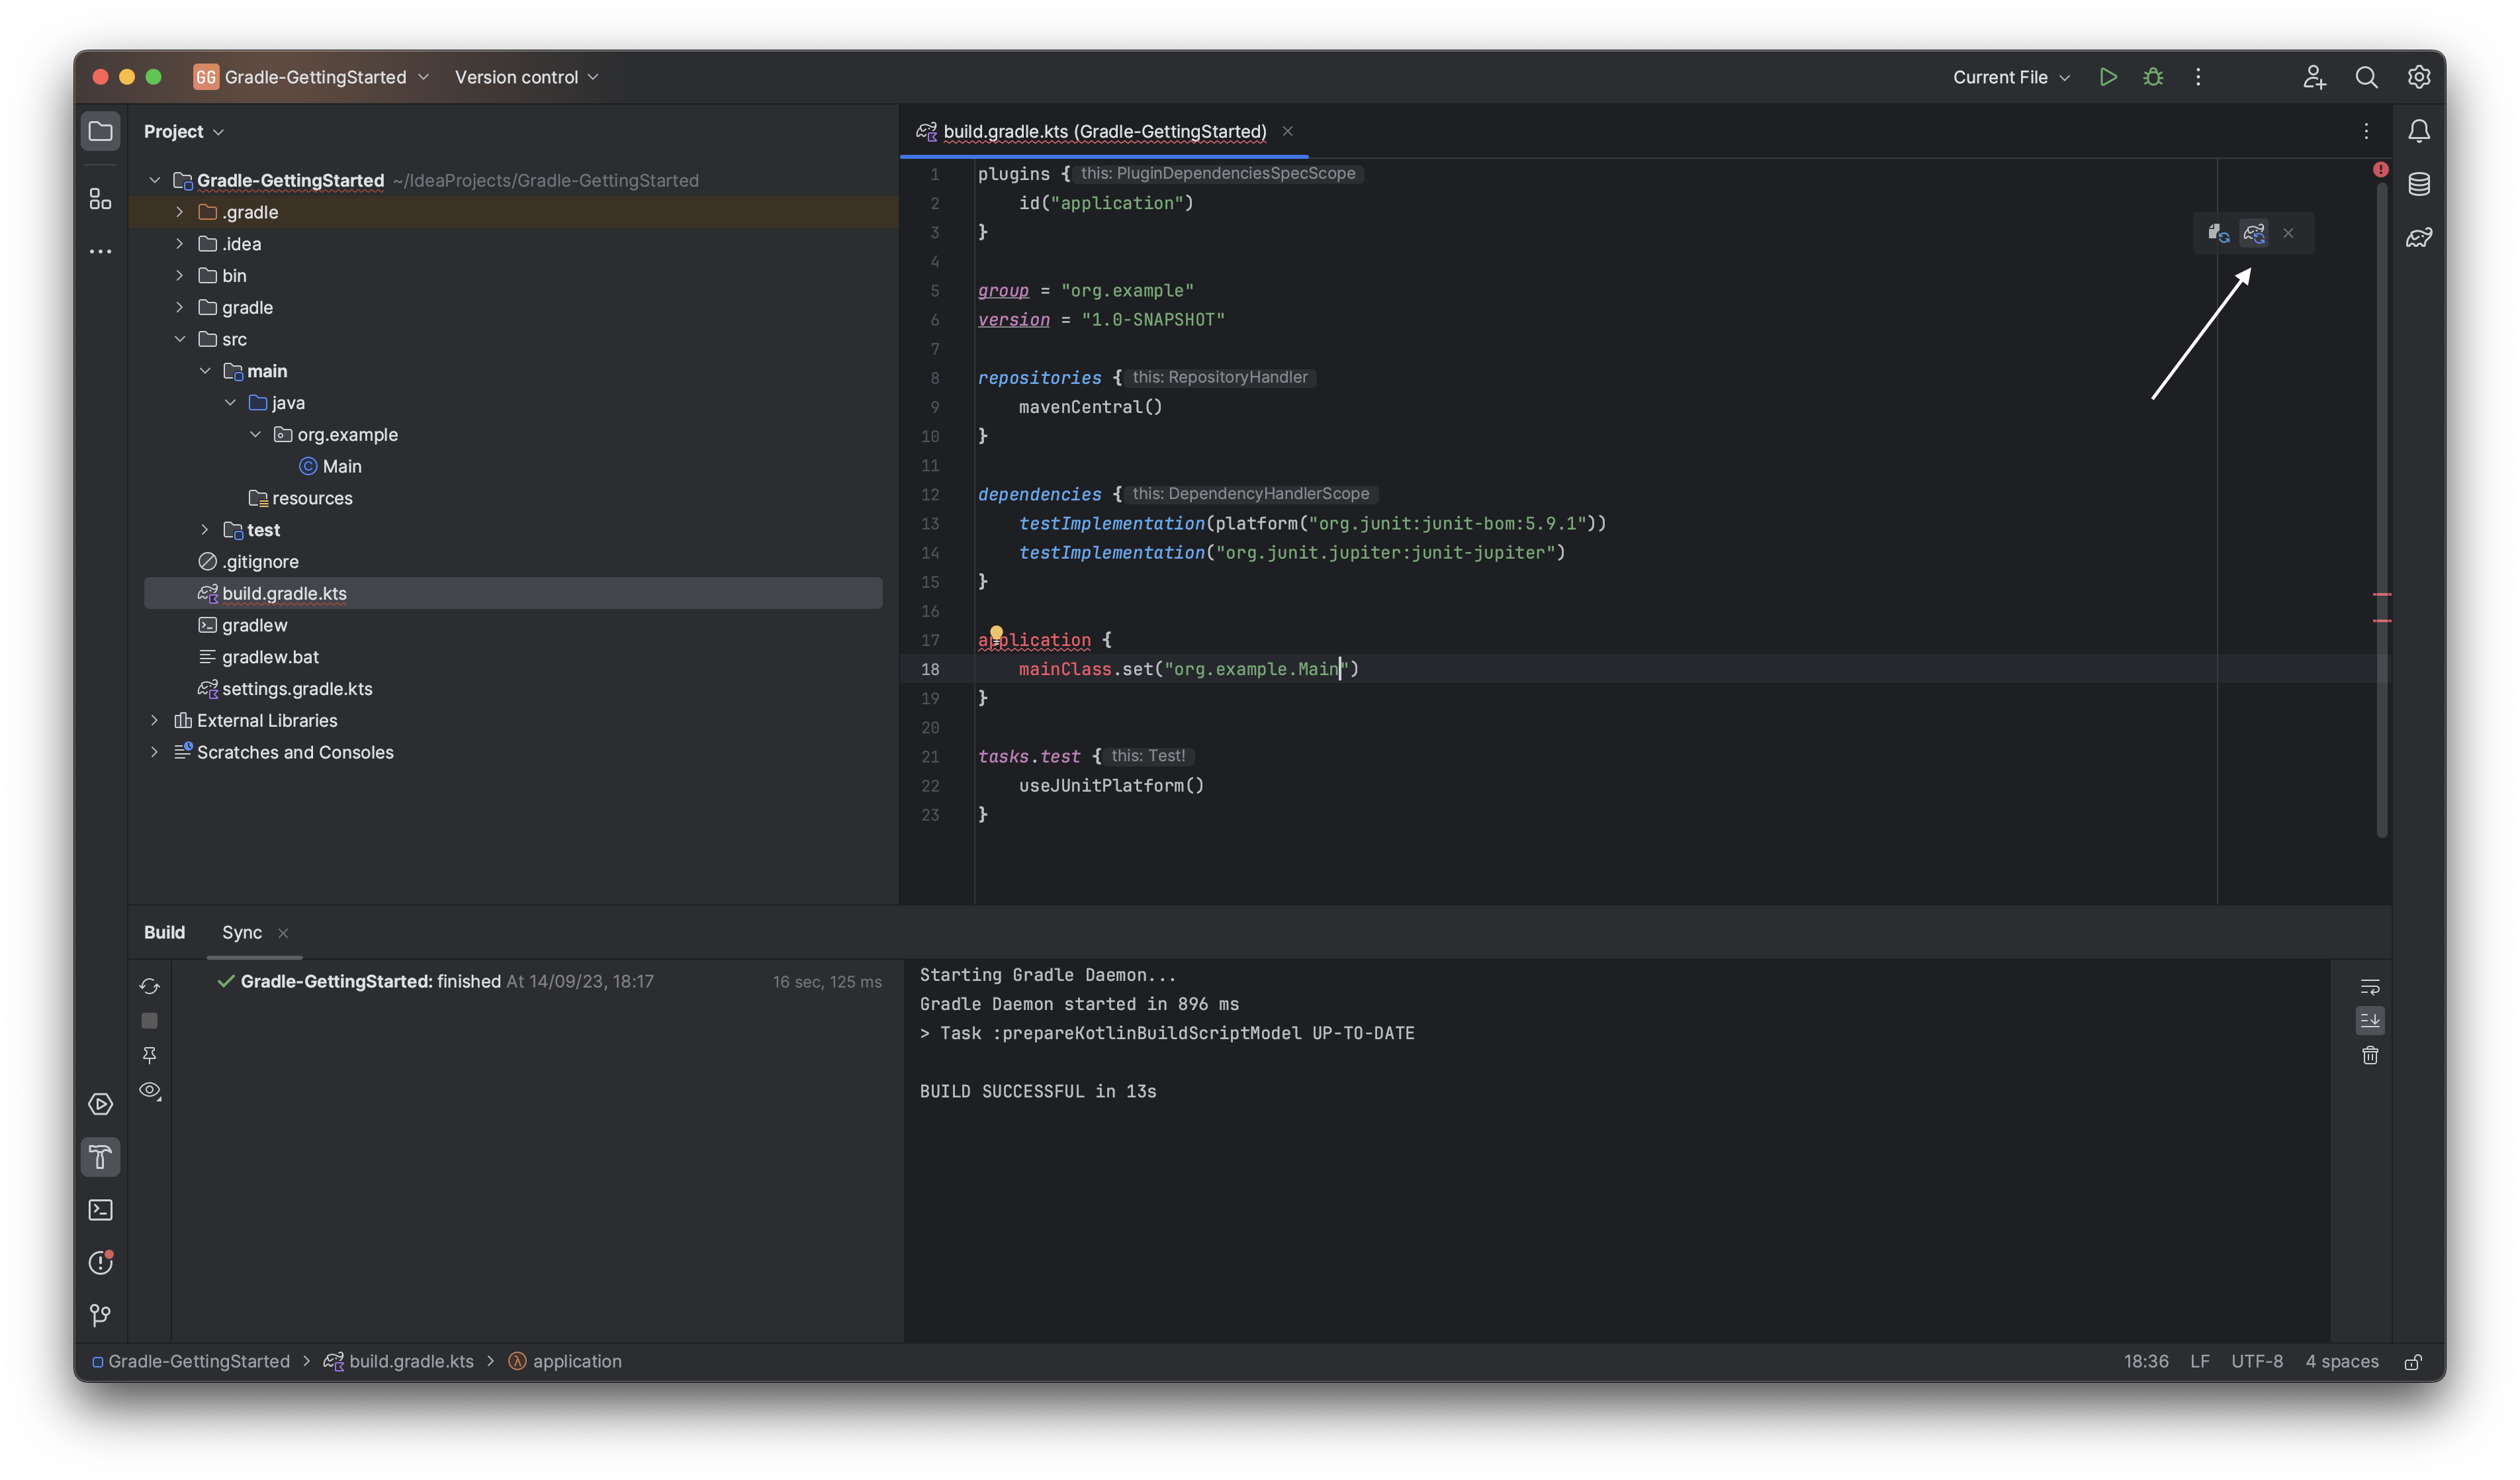
 Now open the build.gradle.kts and replace all the content with the next snippet of code (we will explain why in the following sections):
plugins {
    id("application")
}

group = "org.example"
version = "1.0-SNAPSHOT"

repositories {
    mavenCentral()
}

dependencies {
    testImplementation(platform("org.junit:junit-bom:5.9.1"))
    testImplementation("org.junit.jupiter:junit-jupiter")
}

application {
    mainClass.set("org.example.Main")
}

tasks.test {
    useJUnitPlatform()
}
Then, click on the elephant icon highlighted by the arrow in the image below (or, if you don’t see it, just reopen the project). This action syncs the IntelliJ Gradle plugin with the changes we made.
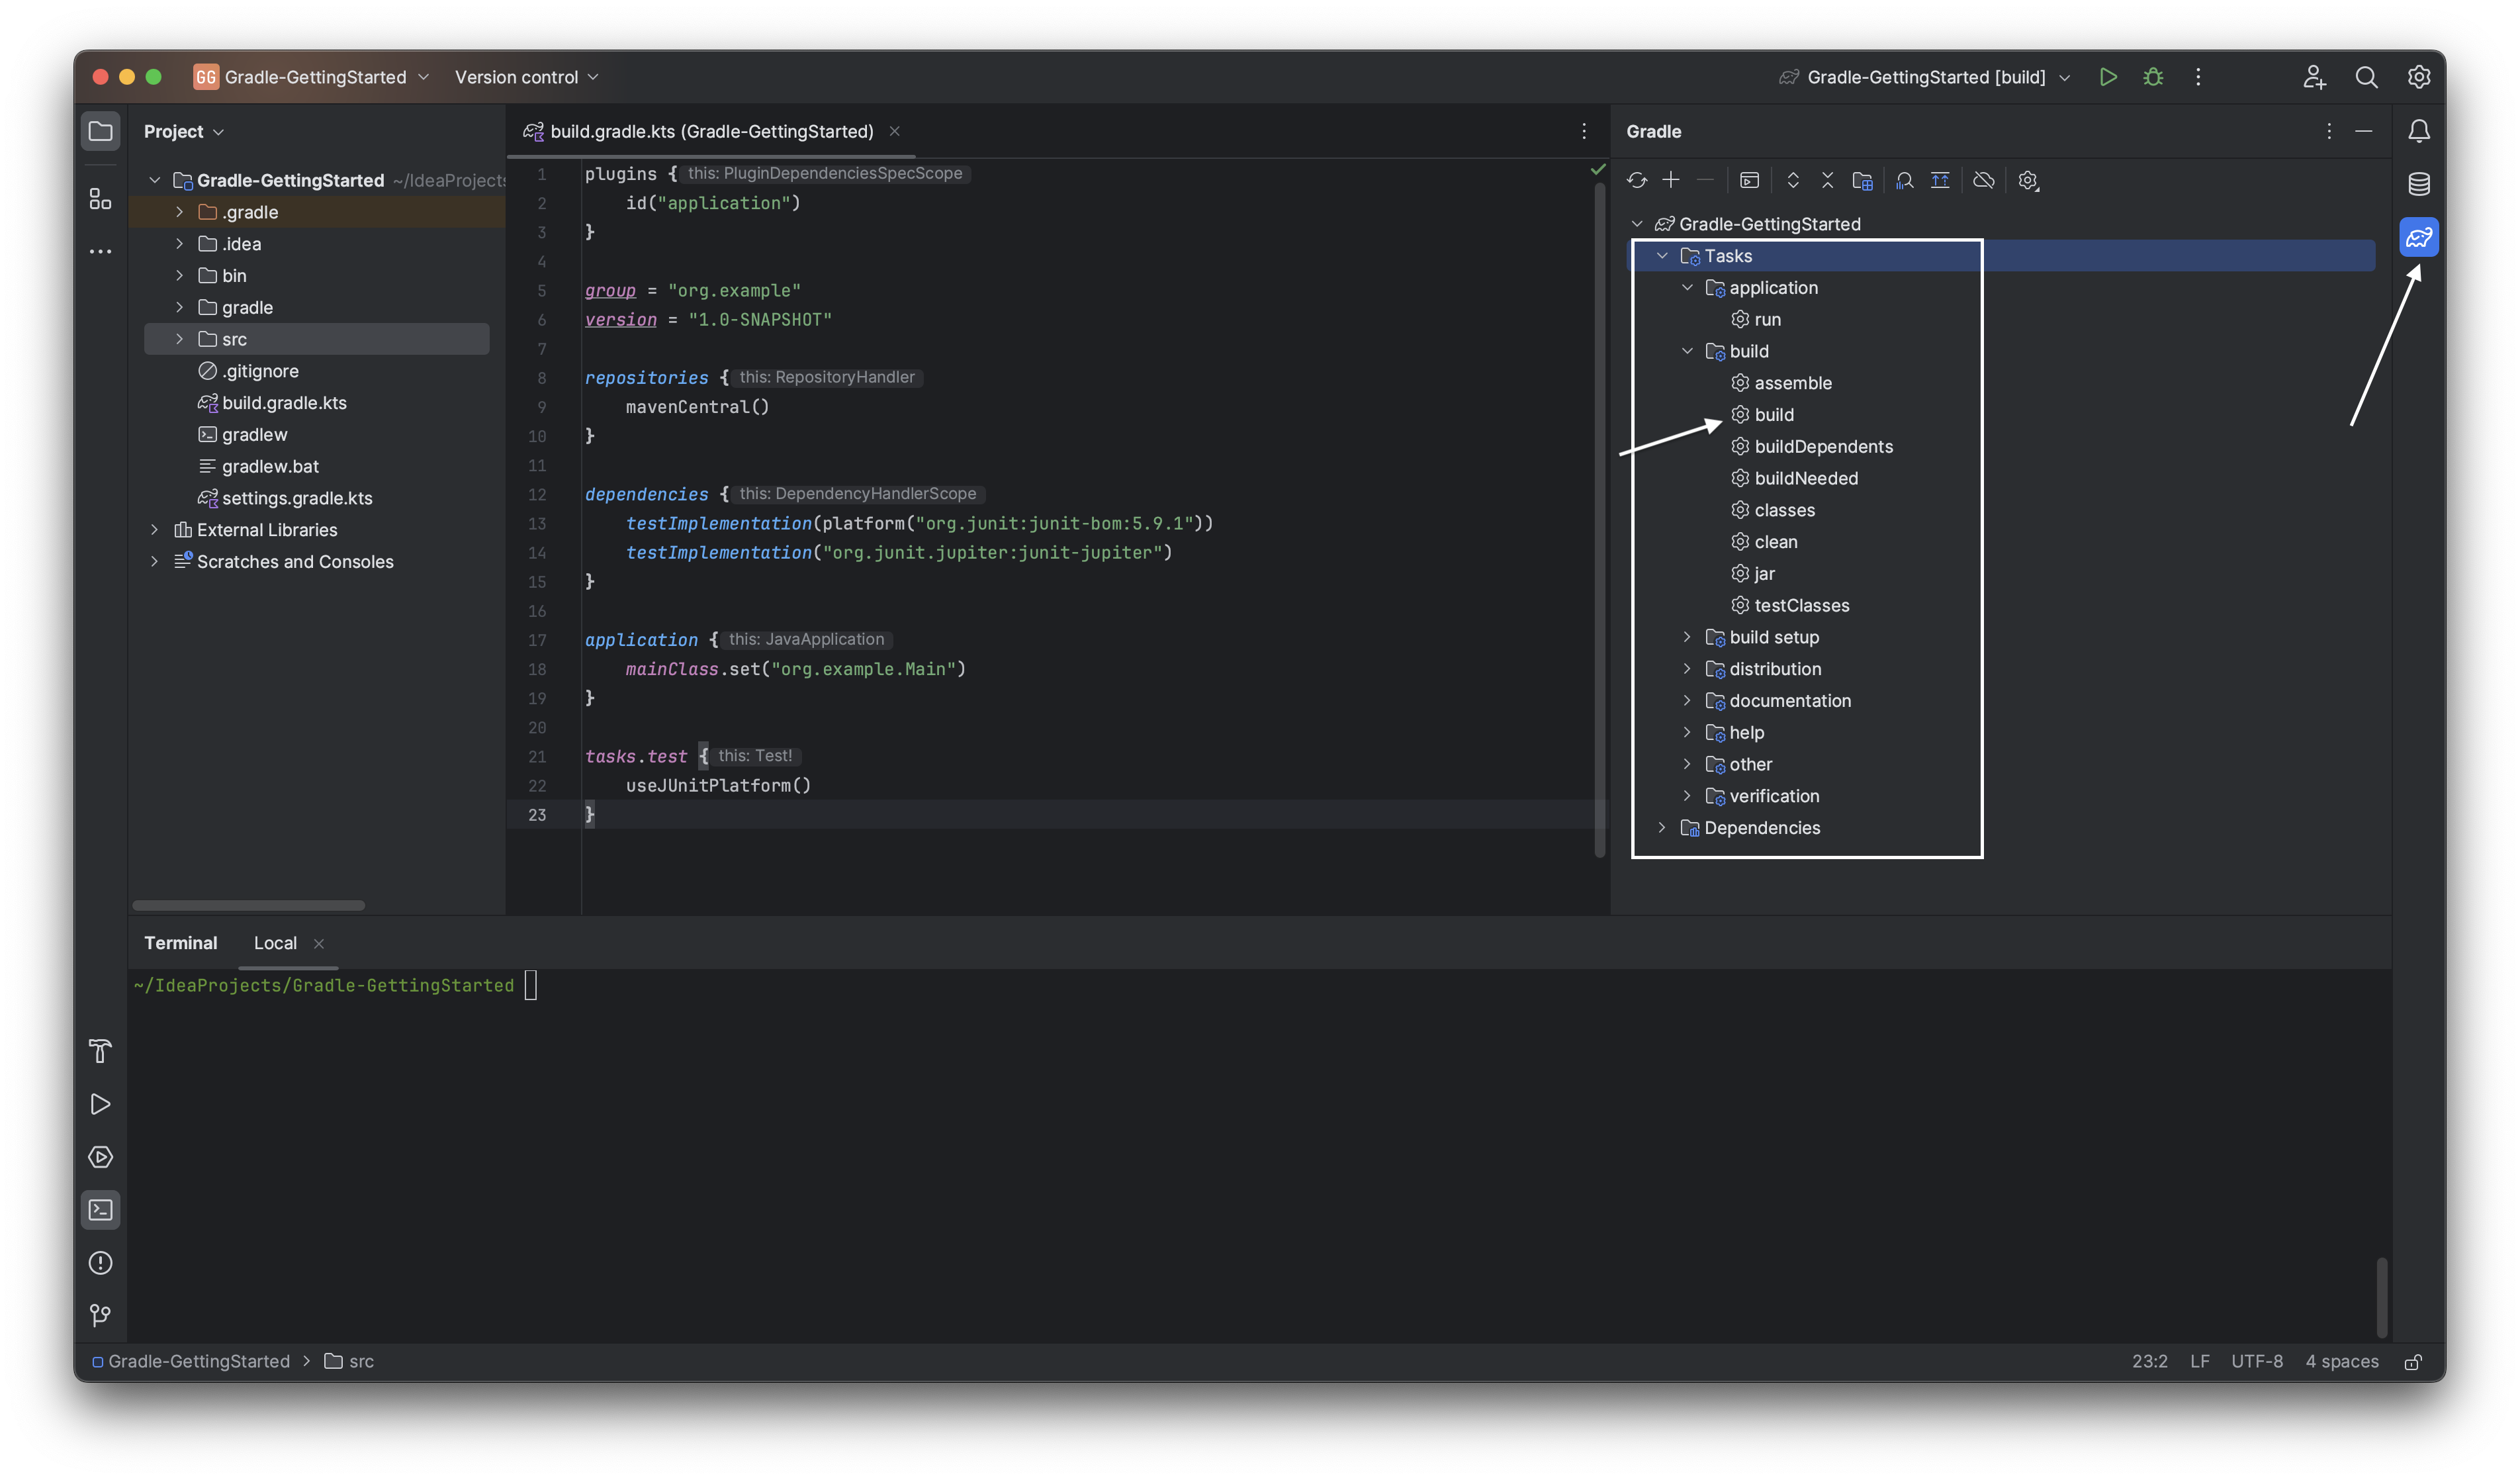
 Now open the Gradle view (the elephant on the left): here, you have a list of all the Gradle tasks that you can launch. A task is a piece of work that Gradle can do with a project. For example, the build task will perform all the steps necessary to get a full build of our Java application. Double-click on it.
 This will open a run panel on the lower side of the IDE that shows what your action does. You should see something like this:
20:22:13: Executing 'build'...

> Task :compileJava
> Task :processResources NO-SOURCE
> Task :classes
> Task :jar
> Task :startScripts
> Task :distTar
> Task :distZip
> Task :assemble
> Task :compileTestJava NO-SOURCE
> Task :processTestResources NO-SOURCE
> Task :testClasses UP-TO-DATE
> Task :test NO-SOURCE
> Task :check UP-TO-DATE
> Task :build

BUILD SUCCESSFUL in 328ms
5 actionable tasks: 5 executed
20:22:14: Execution finished 'build'.
As you can notice, some tasks were called sequentially, and a new folder appeared in your project. If you navigate on it, you can see that it contains different subfolders: classes, distributions, generated, libs, and so on. On these folders you get your application in different “formats”: for example, you get it as a .jar library, as a set of .class files, or as archives (.zip and .tar) for distribution.
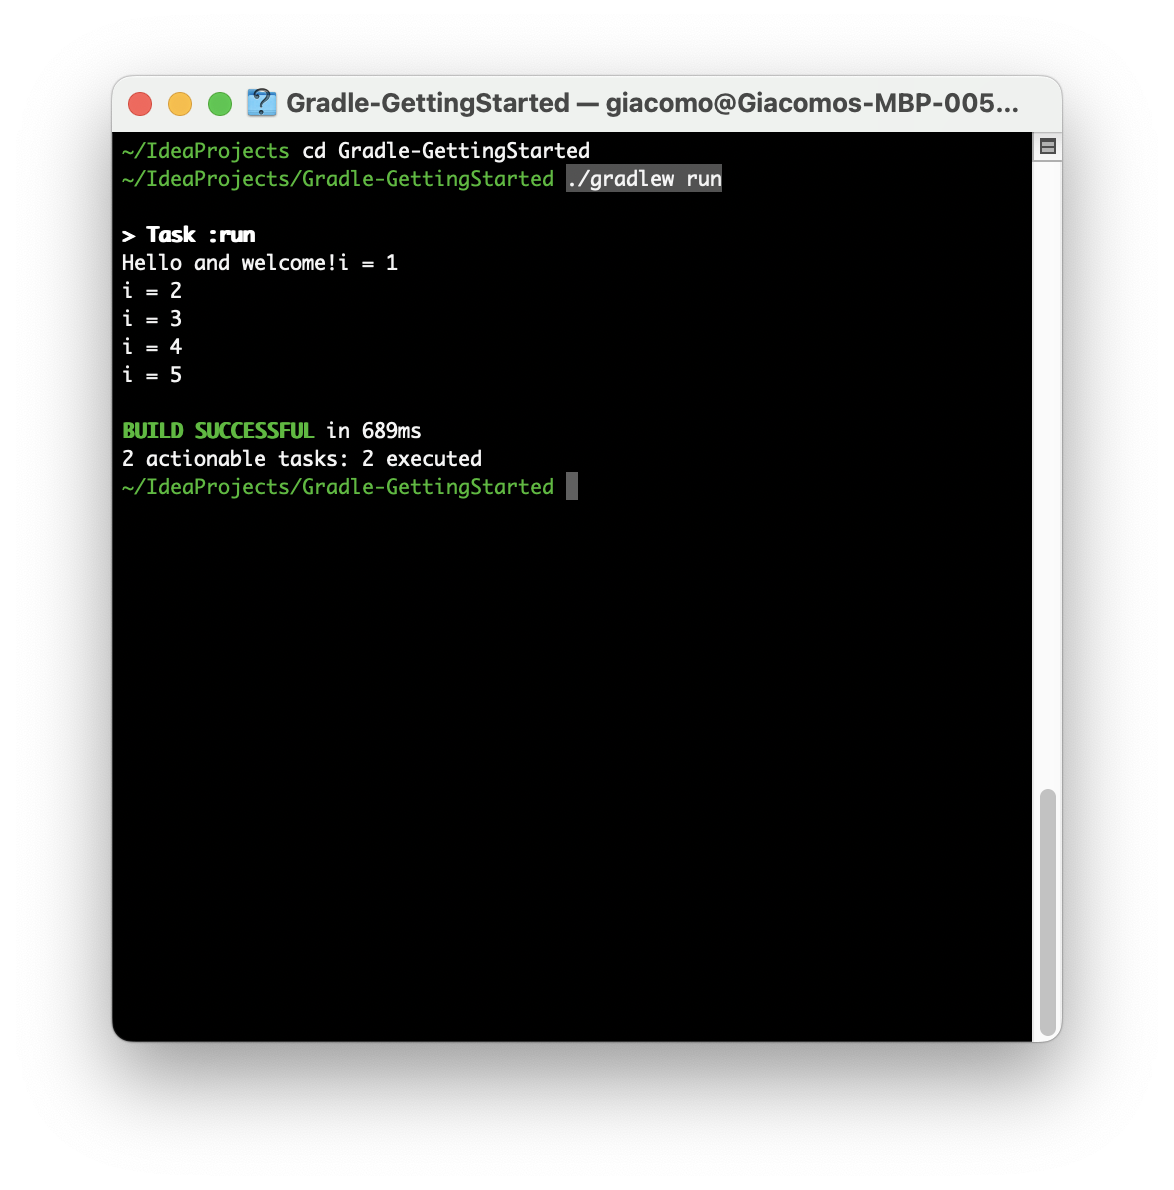
Now double-click on the run task, under the application folder:
20:49:10: Executing 'run'...

> Task :compileJava UP-TO-DATE
> Task :processResources NO-SOURCE
> Task :classes UP-TO-DATE

> Task :run
Hello and welcome!i = 1
i = 2
i = 3
i = 4
i = 5

BUILD SUCCESSFUL in 163ms
2 actionable tasks: 1 executed, 1 up-to-date
20:49:11: Execution finished 'run'.
This action will perform all the necessary steps to run the application: as you can see, first it will call the compileJava task (that as the name suggests compile the Java application) and generate a .class file. In this case, we did not generate .jar, .zip, and .tar files, because we just wanted to run the application.
Command-Line Gradle
A keen eye might have noticed that on the root folder of our project, there are two script files: gradlew and gradlew.bat. These files are wrappers of gradle and permit launching tasks directly from the terminal. Just try to launch ./gradlew tasks (if you are on macOS / Linux) or gradlew.bat tasks (if you are on Windows). This command will list all the available tasks. You can launch tasks by ./gradlew <task> (or ./gradlew.bat <task>), replacing <task> with the task name. For example:
A Quick Note About DSL
Maybe you noticed that during the creation of the project you could choose the Gradle DSL (Domain Specific Language). This goes to specifies the language that you want to use for your Gradle build file (more details on this file later). Kotlin is the preferred choice since it is more readable and offers better compile-time checks since Kotlin is statically typed. However, syntax differences are minimal, so you can choose whatever you prefer.